参考资料
Prometheus 核心组件
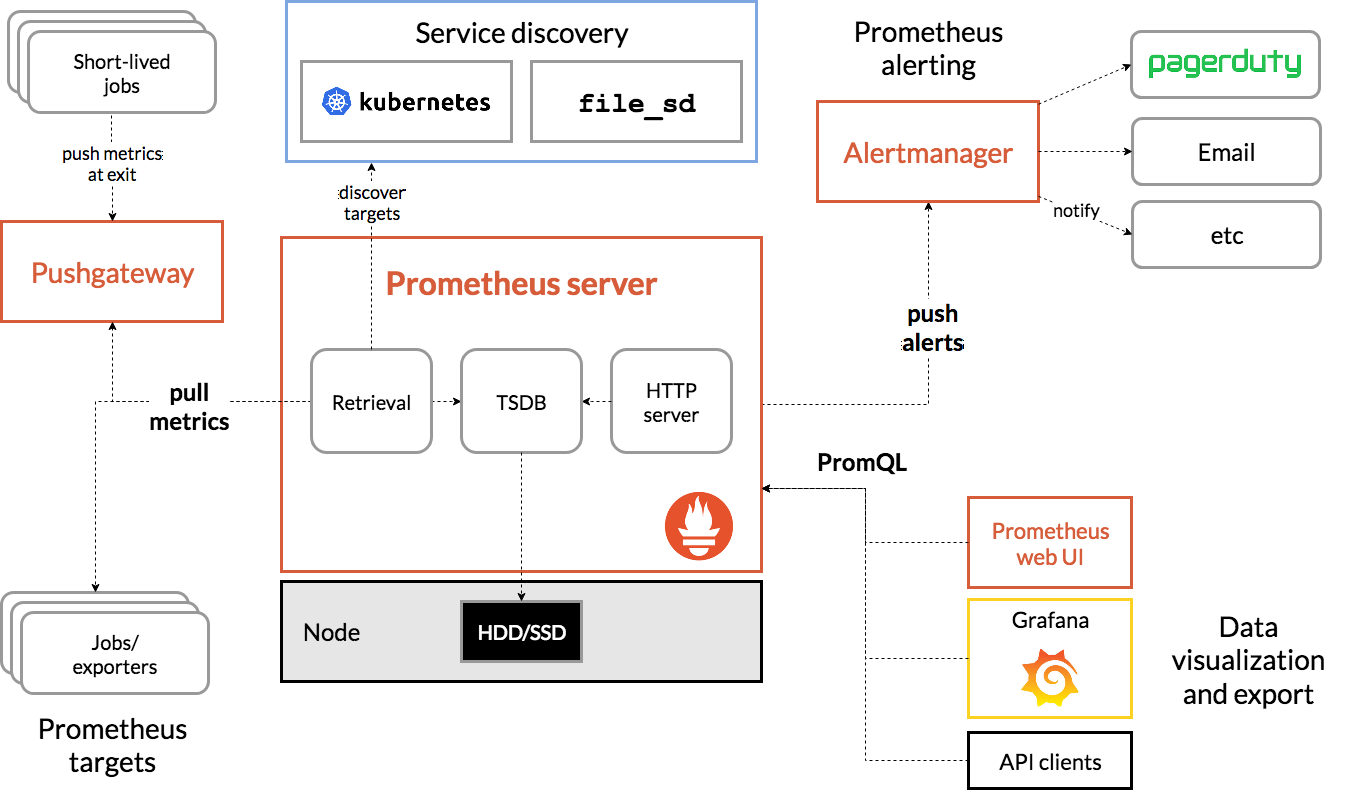
Prometheus Server
Prometheus组件中的核心部分,负责实现对监控数据的获取,存储以及查询。
Prometheus Server本身就是一个时序数据库,将采集到的监控数据按照时间序列的方式存储在本地磁盘当中。
Prometheus Server对外提供了自定义的PromQL语言,实现对数据的查询以及分析。
AlertManager
AlertManager为告警处理中心。Prometheus Server中支持基于PromQL创建告警规则,如果满足PromQL定义的规则,则会产生一条告警,而告警的后续处理流程则由AlertManager进行管理。
Exporters
Exporter将监控数据采集通过HTTP方式暴露,Prometheus Server通过拉的方式获取监控数据
PushGateway
如果监控数据不能通过Pull方式采集,可以将监控数据Push到PushGateway,然后Prometheus Server到PushGateway Pull
PromQL
time-series(时间序列)
Prometheus Server将采集到的数据以time-series(时间序列)方式保存在内存数据库中,并定时落到磁盘中。
time-series按照时间戳和值的序列顺序存放,time-series中的每个数据称之为sample(样本)。
sample(样本) 由3部分组成:
metric(指标): metric name + labelsetstimestamp(时间戳): 精确到毫秒value(样本值): folat64的浮点型数据表示当前样本的值
1 | <--------------- metric ---------------------><-timestamp -><-value-> |
metric(指标)
metric 是 time-series数据中重要组成部分,metric格式如下:
1 | <-metric name-><----------labelsets---------> |
metric name: 反映被监控样本的含义,可由ASCII字符、数字、下划线以及冒号组成并必须符合正则表达式[a-zA-Z_:][a-zA-Z0-9_:]*labelsets: 反映当前样本的特征维度,通过这些维度Prometheus可以对样本数据进行过滤,聚合等。label = label name + label value,label name由ASCII字符、数字以及下划线组成并满足正则表达式[a-zA-Z_][a-zA-Z0-9_]*。以__作为前缀的标签,是系统保留的关键字,只能在系统内部使用。以下两个metric是完成相同的1
2
3api_http_requests_total{method="POST", handler="/messages"}
{__name__="api_http_requests_total",method="POST", handler="/messages"}
metric type(指标类型)
Prometheus 定义了4种metric type(指标类型)
- Counter (计数器)
- Gauge (仪表盘)
- Histogram (直方图)
- Summary (摘要)
Counter 计数器
Counter类型的指标只增不减(除非系统发生重置),侧重于累计。一般在定义Counter类型指标的名称时推荐使用_total作为后缀,如: http_requests_total。
Gauge 仪表盘
Gauge类型的指标可增可减,侧重于反应系统的当前状态。
Histogram 直方图
Histogram类型的指标主用用于统计和分析样本的分布情况。主要用于表示一段时间范围内对数据进行采样,并能够对其指定区间以及总数进行统计,如: http_response_time、http_response_size。
<basename>_bucket{le="<upper inclusive bound>"}、<basename>_bucket{le="+Inf"}、<basename>_sum、<basename>_count 组成。
Histogram 需要通过 histogram_quantile函数在服务器端计算出分位数,Sumamry的分位数则是直接在客户端计算完成
Summary 摘要
Summary类型和Histogram类型类似,主要用于表示一段时间内数据采样结果,它直接存储了quantile数据,而不是根据统计区间计算出来的。
<basename>{quantile="<φ>"}、<basename>_sum、<basename>_count 组成。
Histogram 需要通过 histogram_quantile函数在服务器端计算出分位数,Sumamry的分位数则是直接在客户端计算完成
PromeQL 语法
匹配模式
完全匹配
=、!=1
2http_requests_total{instance="localhost:9090"}
http_requests_total{instance!="localhost:9090"}正则匹配
=~、!~PromQL支持使用正则表达式作为匹配条件,多个表达式之间使用
|进行分离1
http_requests_total{environment=~"staging|testing|development",method!="GET"}
范围查询
PromQL支持查询一段时间范围内的样本数据,时间范围通过时间范围选择器[]进行定义。时间单位支持如下:
1 | s - 秒 |
1 | http_request_total{}[5m] |
时间位移操作
PromQL支持时间位移操作以查询过去某时间数据,位移操作关键字为 offset
1 | http_request_total{} offset 5m |
操作符
数学运算符
+(加法)-(减法)*(乘法)/(除法)%(求余)^(幂运算)
1 | node_memory_free_bytes_total / (1024 * 1024) |
布尔运算符
==(相等)!=(不相等)>(大于)<(小于)>=(大于等于)<=(小于等于)
1 | (node_memory_bytes_total - node_memory_free_bytes_total) / node_memory_bytes_total > 0.95 |
集合运算符
and(并且)or(或者)unless(排除)
操作符优先级
^*, /, %+, -==, !=, <=, <, >=, >and, unlessor
聚合操作
PromeQL内置聚合操作符
sum(求和)min(最小值)max(最大值)avg(平均值)stddev(标准差)stdvar(标准差异)count(计数)count_values(对value进行计数)bottomk(后n条时序)topk(前n条时序)quantile(分位数)
聚合操作语法
1 | <aggr-op>([parameter,] <vector expression>) [without|by (<label list>)] |
只有count_values, quantile, topk, bottomk支持parameter(参数)
without用于从计算结果中移除列举的标签,而保留其它标签。by则正好相反,结果向量中只保留列出的标签,其余标签则移除。
1 | sum(http_requests_total) without (instance) |
内置函数
Prometheus Server
Prometheus Server 部署启动
安装
直接下载二进制包
1
https://prometheus.io/download/#prometheus
启动
1
nohup /usr/local/prometheus/prometheus --config.file=/usr/local/prometheus/prometheus.yml --storage.tsdb.path=/data/prometheus --storage.tsdb.retention=1d --web.enable-lifecycle &>/var/log/prometheus.log &
--config.file: Prometheus默认加载当前目录下的prometheus.yaml配置文件,可使用此启动参数修改--storage.tsdb.path: Prometheus也是一个时间序列数据库,其采集的数据会以文件的形似存储在本地中,默认的存储路径为data/,使用此启动参数修改本地存储路径--storage.tsdb.retention: 数据保留时间--web.enable-lifecycle: 开启此参数后,可通过HTTP请求平滑重启Prometheus
平滑重启加载配置文件
需开启
--web.enable-lifecycle参数1
curl -XPOST http://localhost:9090/-/reload
Prometheus UI 地址
1
http://localhost:9090
Prometheus Server 配置文件
Prometheus默认使用prometheus.yaml配置文件,也在启动时使用--config.file指定。prometheus.yaml主要由以下部分组成:
global: 全局配置alerting: alertmanager 相关配置rule_files: 告警规则相关配置scrape_configs: 数据拉取相关配置remote_write: 远程写相关配置remote_read: 远程读相关配置
global 全局配置
1 | global: scrape_interval: 15s # 拉取 targets 的时间间隔 evaluation_interval: 15s # 执行 rules 的时间间隔 scrape_timeout: 10s # 拉取一个 target 的超时时间 external_labels: # 额外的属性,会添加到拉取的数据并存到数据库中 monitor: 'codelab-monitor' |
alerting 告警配置
1 | alerting: alertmanagers: # 用于动态发现 Alertmanager 的配置 - static_configs: - targets: - 192.168.1.180:9093 - 192.168.1.181:9093 #alert_relabel_configs: # 动态修改 alert 属性的规则配置 #- |
rule_files 规则配置
1 | rule_files: # 主要用于配置 rules 文件,它支持多个文件以及文件目录 - "rules/*.yml" |
自定义告警规则
指定告警文件后,可针对具体服务配置自定义告警规则。将一组相关的规则设置定义在一个group下,在每个group中定义多个告警规则(rule)。
- alert:告警规则的名称。
- expr:基于PromQL表达式告警触发条件,用于计算是否有时间序列满足该条件。
- for:评估等待时间,可选参数。用于表示只有当触发条件持续一段时间后才发送告警。在等待期间新产生告警的状态为pending。
- labels:自定义标签,允许用户指定要附加到告警上的一组附加标签。
- annotations:用于指定一组附加信息,比如用于描述告警详细信息的文字等,annotations的内容在告警产生时会一同作为参数发送到Alertmanager。
- record: Prometheus支持根据现有metric通过计算生产新的metric,此特性可用于由于性能提高查询效率,也可以用于生成新的metric值
1 | groups: - name: redis rules: - alert: RedisDownProblem expr: sum by (addr) (redis_up) != 1 for: 1m labels: tag: "{{ $labels.addr }}" level: CRITICAL annotations: message: "{{ $labels.addr }} {{ $labels.rgroup }} redis is down!" - alert: RedisConnectionProblem expr: sum by (addr) (redis_connected_clients / redis_config_maxclients) * 100 >= 95 for: 2m labels: tag: "{{ $labels.addr }}" annotations: info: "{{ $labels.addr }} redis connected connections {{ $value }}, reach 95%" - record: elasticsearch_transport_rx_bps expr: ( elasticsearch_transport_rx_size_bytes_total - ( elasticsearch_transport_rx_size_bytes_total offset 60s)) /8/60 |
scrape_configs 数据拉取配置
- job_name:任务名称
- honor_labels: 用于解决拉取数据标签有冲突,当设置为 true, 以拉取数据为准,否则以服务配置为准
- params:数据拉取访问时带的请求参数
- scrape_interval: 拉取时间间隔
- scrape_timeout: 拉取超时时间
- metrics_path: 拉取节点的 metric 路径
- scheme: 拉取数据访问协议
- sample_limit: 存储的数据标签个数限制,如果超过限制,该数据将被忽略,不入存储;默认值为0,表示没有限制
- relabel_configs: 拉取数据重置标签配置
- metric_relabel_configs:metric 重置标签配置
- static_configs:exporter地址配置
1 | scrape_configs: - job_name: 'redis' static_configs: - targets: ['192.168.1.180:9121'] labels: group: ops |
remote_write 远程写
1 | remote_write: - url: "http://localhost:8088/prometheus" # 访问地址 #- remote_timeout: 30s # 请求超时时间 #- write_relabel_configs: # 标签重置配置, 拉取到的数据,经过重置处理后,发送给远程存储 #- [ - <relabel_config> ... ] |
remote_read 远程读
1 | remote_read: - url: "http://localhost:8088" # 访问地址 - remote_timeout: 30s # 请求超时时间 |
AlertManager
AlertManager对收到的告警信息进行处理,包括去重,降噪,分组,策略路由告警通知等。AlertManager还提供了静默和告警抑制机制来对告警通知行为进行优化。

AlertManager 部署启动
安装
直接下载二进制包
1
2https://prometheus.io/download/#alertmanager
# https://github-production-release-asset-2e65be.s3.amazonaws.com/11452538/99c4aad8-10a1-11e8-9ead-55da24ff8da3?X-Amz-Algorithm=AWS4-HMAC-SHA256&X-Amz-Credential=AKIAIWNJYAX4CSVEH53A%2F20180615%2Fus-east-1%2Fs3%2Faws4_request&X-Amz-Date=20180615T062841Z&X-Amz-Expires=300&X-Amz-Signature=11da1a2b6bb688ca0e92bcb1cd5c2b6c14f796f3a8530fed1242523c2798b48e&X-Amz-SignedHeaders=host&actor_id=0&response-content-disposition=attachment%3B%20filename%3Dalertmanager-0.14.0.linux-amd64.tar.gz&response-content-type=application%2Foctet-stream启动
1
2
3cd /usr/local/alertmanager
/usr/local/alertmanager/alertmanager --web.listen-address=:9093 --mesh.listen-address=:9094 --mesh.nickname=:9094 --config.file=/usr/local/alertmanager/alertmanager.yaml --storage.path=/data1/alert/ --data.retention=24h
# ./alertmanager --config.file=alertmanager.yaml --storage.path=/data1/alert/ --data.retention=24h --log.level=debug平滑重启加载配置文件
1
curl -X POST http://localhost:9093/-/reload
AlertManager 特性
AlertManager除了基础的告警功能外,还提供: 去重、抑制和静默等功能

分组
分组机制将详细的告警信息合并成一个通知,按照设定的关键字对告警进行分组,能有效将告警内聚在一起成为一个通知,防止告警风暴
抑制
当某一告警发出后,可以停止重复发送由此告警引发的其它告警的机制。
静默
AlertManager提供简单机制,可根据label对告警进行临时静默,访问AlertManager的Web界面可进行设置
1 | http://localhost:9093 |
AlertManager 配置文件
AlertManager默认加载alertmanager.yaml配置文件,可通过启动参数--config.file指定配置文件
AlertManager配置主要包含以下部分:
global: 全局配置,用于定义全局的公共参数,如全局的SMTP配置,Slack配置等内容templates: 模板,用于定义告警通知时的模板,如HTML模板,邮件模板等route: 告警路由,根据标签匹配,确定当前告警应该如何处理receivers: 接收对象,可以是一个邮箱也可以是微信,Slack或者Webhook等,接收对象一般配合告警路由使用inhibit_rules: 抑制规则,抑制告警风暴
global 全局配置
1 | global: resolve_timeout: 5m # 持续多长时间未接收到告警后标记告警状态为resolved smtp_smarthost: '<smtp_host>:25' smtp_from: '<user>@<smtp_domain>' smtp_auth_username: '<user>' smtp_auth_password: '<password>' |
route 路由配置
route定义一个基于标签匹配规则的告警路由树,AlertManager根据route决定receiver。
每一个告警都会从顶级的route进入路由树,默认情况下,告警进入到顶级route后会遍历所有的子节点,直到找到最深的匹配route(最长匹配原则),并将告警发送到该route定义的receiver中,但可通过continue: [true|false]决定是否继续匹配后续子route。
路由匹配有两种方式:
- 基于字符串验证
match: 根据labelname是否等于labelvalue进行匹配 - 基于正则表达式
match_re: 根据labelvalue是否满意正则表达式进行匹配
告警分组是通过group_by来定义,基于告警中包含的label进行分组,分组主要由4个配置项:
group_by: 根据label定义分组,相同label会被合并成一个通知。group_by: [key1, key2],只有在key1和key2都一样,才会被分到一个组group_wait: 等待时间以收集多个告警,以便进行分组、去重和合并group_interval: 定义相同分组之间发送告警的时间间隔repeat_interval: 警报已经成功发送通知, 设置下次发送告警通知之前要等待时间
1 | route: receiver: 'default-receiver' # 默认receiver group_wait: 30s group_interval: 5m repeat_interval: 4h group_by: [cluster, alertname] # 默认按照cluster 和 alertname 进行分组 routes: # DB子route,告警包含service label,若service标签包含mysql或cassandra关键字,则发送给名为`database-pager`的receiver。 # 由于DB子route没有设置`group_by`,继承默认设置group_by: [cluster, alertname] - receiver: 'database-pager' group_wait: 10s match_re: service: mysql|cassandra # - receiver: 'frontend-pager' group_by: [product, environment] match: team: frontend |
receiver 接收配置
每个receiver具有全局唯一名称,一个receiver可有多种通知方式(email/webhook/slack…)
1 | receivers: - name: 'webhook' webhook_configs: - url: 'http://xxxxxx/xxxxxx' - name: 'email' email_configs: - to: '' - name: 'default' webhook_configs: - url: 'http://xxxxxx/xxxxxx' email_configs: - to: '' |
inhibit_rules 抑制配置
抑制规则能有效防止告警风暴,主要有3个配置项目:
target_match|target_match_re: 匹配已发送告警source_match|source_match_re: 匹配新入告警equal: 定义label,匹配新告警的label和target_match|target_match_re中的label
已经发送的告警通知匹配到target_match或target_match_re规则,当有新的告警规则如果满足source_match或source_match_re,并且已发送的告警与新产生的告警中equal定义的标签完全相同,则启动抑制机制,新的告警不会发送。
1 | - source_match: alertname: NodeDown severity: critical target_match: severity: critical equal: - node |
当集群中的某一个主机节点异常宕机导致告警NodeDown被触发,同时在告警规则中定义了告警级别severity=critical。由于主机异常宕机,该主机上部署的所有服务,中间件会不可用并触发报警。根据抑制规则的定义,如果有新的告警级别为severity=critical,并且告警中标签node的值与NodeDown告警的相同,则说明新的告警是由NodeDown导致的,则启动抑制机制停止向接收器发送通知。
Exporter
elasticsearch_exporter
安装
直接下载二进制包 elasticsearch_exporter release
启动
1
2
3
4# ./elasticsearch_exporter -es.uri "http://192.168.1.180:9200" -es.all -es.indices
# nohup ./elasticsearch_exporter -es.uri "http://localhost:9200" &> elasticsearch_exporter.log &
# nohup ./elasticsearch_exporter -es.uri "http://192.168.1.181:9200" -web.listen-address "192.168.1.181:9108" &> elasticsearch_exporter.log &
./elasticsearch_exporter -es.uri "http://192.168.1.180:9200"prometheus配置
1
# prometheus.yml - job_name: 'elasticsearch' static_configs: - targets: ['localhost:9108']
redis_exporter
安装
1
2
3go get github.com/oliver006/redis_exporter
cd $GOPATH/src/github.com/oliver006/redis_exporter
go build启动
1
nohup ./redis_exporter -redis.addr 10.10.10.68:63910,10.10.10.49:63910 -redis.password '<redis_password>' &> redis_exporter.log &
prometheus配置
1
# prometheus.yml - job_name: 'redis' static_configs: - targets: ['localhost:9121']
rabbitmq_exporter
安装
启动
1
2# PUBLISH_PORT=9419 RABBIT_CAPABILITIES=bert,no_sort RABBIT_URL="http://192.168.1.180:15672" RABBIT_USER="<user>" RABBIT_PASSWORD="<password>" nohup ./rabbitmq_exporter &> rabbitmq_exporexporter.log &
PUBLISH_PORT=9419 RABBIT_URL="http://10.10.10.32:15672" RABBIT_EXPORTERS="exchange,node,overview,queue,connections" RABBIT_USER="<user>" RABBIT_PASSWORD="<password>" nohup ./rabbitmq_exporter &> /var/log/rabbitmq_exporter.log &prometheus配置
1
# prometheus.yml - job_name: 'rabbitmq' static_configs: - targets: ['localhost:9419']
node_exporter
安装
1
2
3
4
5
6
7
8yum install glibc-static
mkdir -p $GOPATH/src/golang.org/x/
cd $GOPATH/src/golang.org/x/
git clone https://github.com/golang/tools.git
go get github.com/prometheus/node_exporter
cd ${GOPATH-$HOME/go}/src/github.com/prometheus/node_exporter
make启动
1
./node_exporter <flags>
配置
1
# prometheus.yml - job_name: 'node' static_configs: - targets: ['localhost:9100']
mysql_exporter
mysql授权
1
CREATE USER 'exporter'@'localhost' IDENTIFIED BY 'mysql_exporter' WITH MAX_USER_CONNECTIONS 3; GRANT PROCESS, REPLICATION CLIENT, SELECT ON *.* TO 'exporter'@'localhost'; FLUSH PRIVILEGES; # 5.1 # CREATE USER 'exporter'@'localhost' IDENTIFIED BY 'mysql_exporter'; # GRANT PROCESS, REPLICATION CLIENT, SELECT ON *.* TO 'exporter'@'localhost' WITH MAX_USER_CONNECTIONS 3; # FLUSH PRIVILEGES;
安装
1
wget -O mysqld_exporter-0.10.0.linux-amd64.tar.gz 'https://github.com/prometheus/mysqld_exporter/releases/download/v0.10.0/mysqld_exporter-0.10.0.linux-amd64.tar.gz'
启动
1
2
3
4
5
6
7
8
9#.my.cnf
[client]
user=exporter
password="<mysql_password>"
port=3306
host=localhost
./mysqld_exporter -config.my-cnf=".my.cnf"
#./mysqld_exporter -config.my-cnf=".my.cnf" -web.listen-address="192.168.1.181:9104"prometheus配置
1
# prometheus.yml - job_name: 'mysql' static_configs: - targets: ['10.10.10.136:9115'] labels: db_instance: db1
mongodb_exporter
安装
1
2
3
4
5# curl https://glide.sh/get | sh
git clone https://github.com/dcu/mongodb_exporter $GOPATH/src/github.com/dcu/mongodb_exporter
cd $GOPATH/src/github.com/dcu/mongodb_exporter
make build
./mongodb_exporter -h启动
1
2./mongodb_exporter -mongodb.uri mongodb://10.10.10.20:27003
# nohup ./mongodb_exporter -mongodb.uri mongodb://10.10.10.20:27003 -web.listen-address ":9001" &> /var/log/mongodb_exporter1.log &prometheus配置
1
# promethues - job_name: 'mongodb' static_configs: - targets: ['10.10.11.15:9001'] labels: mgroup: APP maddr: 10.10.10.20:27003
Adapter
InfluxDB
prometheus默认的adapter支持Graphite、OpenTSDB、InfluxDB,remote_storage_adapter
安装
1
2
3go get github.com/prometheus/prometheus/documentation/examples/remote_storage/remote_storage_adapter
cd $GOPATH/github.com/prometheus/prometheus/documentation/examples/remote_storage/remote_storage_adapter
go build启动
1
./remote_storage_adapter -influxdb-url=http://localhost:8086/ -influxdb.database=prometheus -influxdb.retention-policy=autogen
prometheus配置
1
#prometheus.yml remote_write: - url: "http://localhost:9201/write"
ElasticSearch
使用Prometheusbeat(Go >= 1.9)作为adapter进行远程写,此adapter处于alpha版本
安装
1
2
3
4
5go get github.com/elastic/beats
cd ${GOPATH}/github.com/infonova/
git clone https://github.com/infonova/prometheusbeat
cd prometheusbeat
make配置
1
# prometheusbeat.yml prometheusbeat: listen: ":8080" context: "/prometheus" version: 2 setup.kibana: output.elasticsearch: hosts: ["localhost:9200"]
1
# prometheus.yml remote_write: - url: "http://localhost:8080/prometheus"
启动
1
2#./prometheusbeat -c prometheusbeat.yml -e -d "*"
./prometheusbeat -c prometheusbeat.yml
高可用
待续…
服务发现
待续…